ESP32 DevKit Boards
There isn't one "ESP32 DevKit" — there's a whole family of boards, and picking the right one saves a lot of pain. This is the board buyer's guide: the DOIT DevKit V1 (30-pin) vs the ESP32-DevKitC (38-pin) vs battery and PSRAM boards, their pinouts side by side, CP2102 vs CH340, power, breadboard fit, and which one to buy. For what each GPIO actually does, see our ESP32 chip guide.
Complete Guide — ESP32 DevKit Boards
From the board family and each board's anatomy, to 30-pin vs 38-pin pinouts, USB chips, power, breadboard fit, a full comparison, a buying guide, first steps and troubleshooting
What is an ESP32 DevKit?
An ESP32 DevKit is a ready-to-use development board built around an ESP32-WROOM-32 module. The module is the brain; the DevKit adds everything you need to actually use it: a USB-to-UART chip for programming, a 3.3 V regulator, EN and BOOT buttons, and two rows of header pins you can push into a breadboard.
The confusing part is that "ESP32 DevKit" is not one product. Many companies make boards around the same module, so you'll see the DOIT DevKit V1, the official ESP32-DevKitC, NodeMCU-32S, LOLIN D32 and more. They run the same code — they differ in pin count, USB chip, size, power options and price. This guide helps you tell them apart and choose.
DevKit vs chip — two different pages
This page is about the boards. To learn what each GPIO does (ADC, DAC, touch, PWM, strapping pins, Wi-Fi, deep sleep) read the ESP32 chip & pinout guide. The two pages work together.
The ESP32 DevKit Board Family
Here are the three you'll meet most often. All carry the same ESP32-WROOM-32 module.
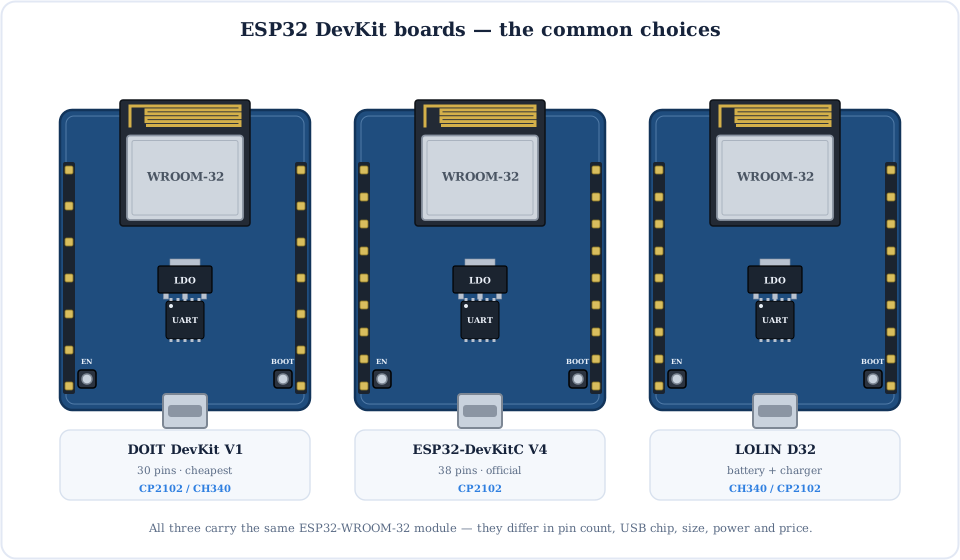
DOIT DevKit V1
The cheapest and most common board. 30 pins (sometimes sold as 36), CP2102 or CH340. Great first board.
ESP32-DevKitC
Espressif's official board. 38 pins, reliable CP2102 USB. The reference design most tutorials assume.
LOLIN D32
A little narrower, with an on-board LiPo charger and JST connector for battery projects.
DOIT ESP32 DevKit V1 (30-pin)
The board most people mean by "an ESP32". It's cheap, everywhere, and a fine place to start.
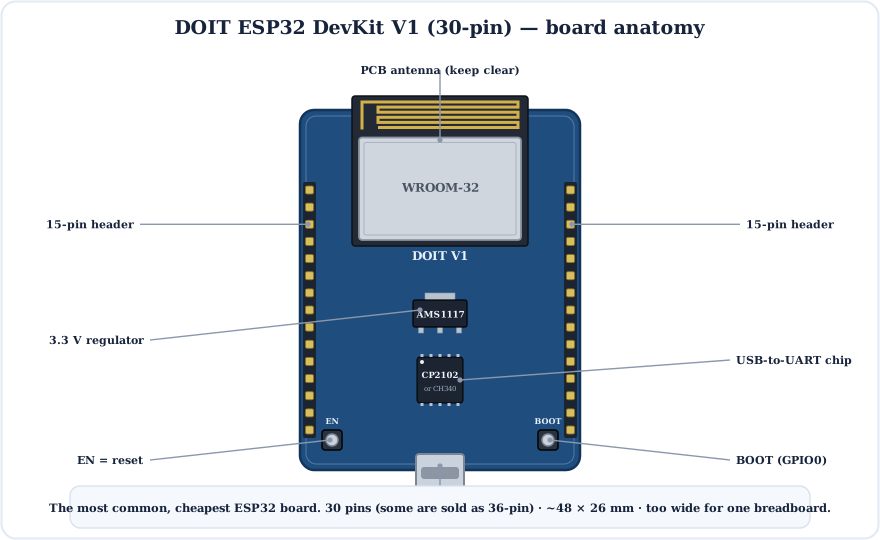
- Pins: 30 (15 per side). Some sellers ship a 36-pin variant — check the photo before buying.
- USB chip: CP2102 on genuine DOIT boards; many clones use the CH340.
- Size: about 48 × 26 mm — wide enough to cover a whole breadboard (see below).
- Best for: learning, most tutorials, and cheap builds where you'll solder it into a project.
ESP32-DevKitC (38-pin)
Espressif's own board and the reference most guides are written against. If you want the "standard" ESP32 board, this is it.
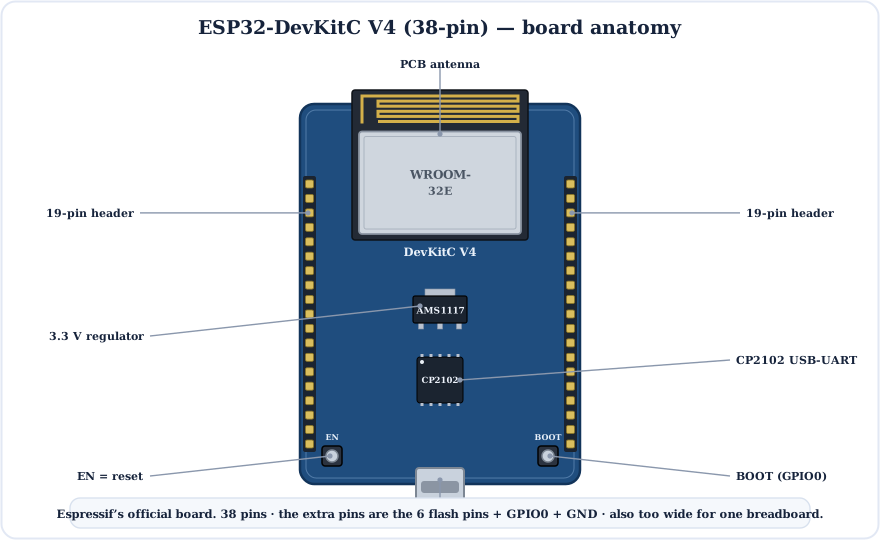
- Pins: 38 (19 per side). It exposes the six flash pins, GPIO0 and extra power/ground pins.
- USB chip: CP2102 (V4 uses a WROOM-32E module and a reliable USB stage).
- Best for: following tutorials exactly, and anyone who wants the official, well-supported board.
Those extra pins aren't all usable
Six of the 38 pins (labelled D0–D3, CMD, CLK = GPIO6–11) connect to the module's SPI flash. Don't wire anything to them or the board crashes. See the safe-pins guide.
30-pin vs 38-pin Pinout
The question everyone asks: what's different between the two pinouts? Less than you'd think.
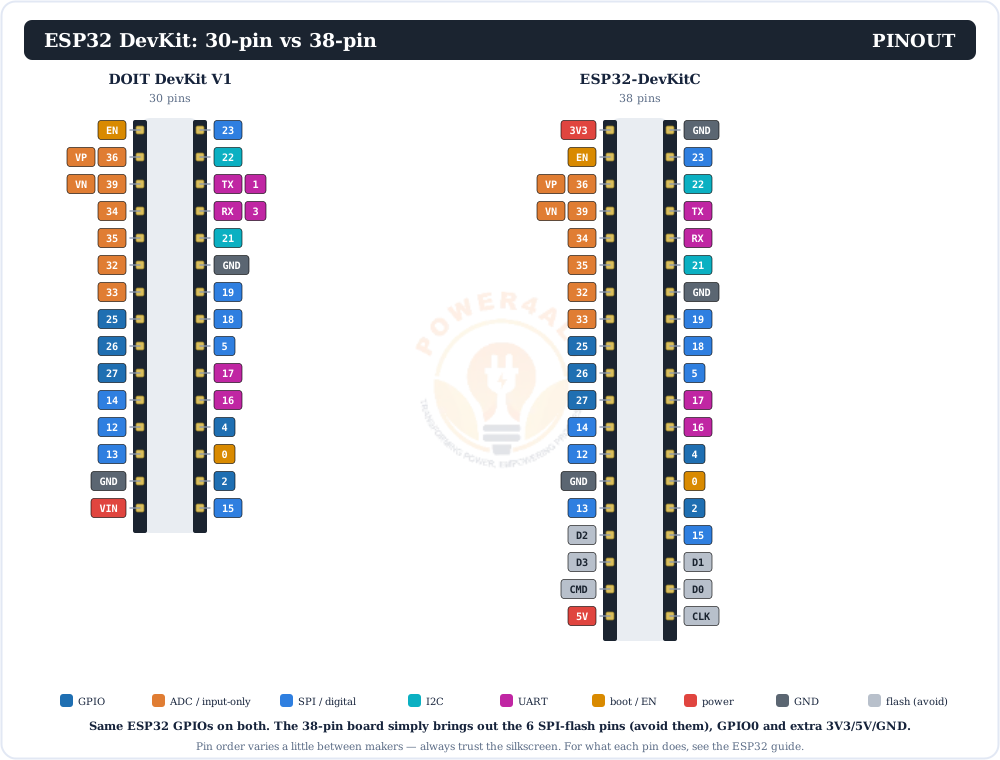
So for a real project the usable pins are identical. If a tutorial says "connect to GPIO21", both boards have it — just find 21 on your board's silkscreen. Remember the labels are GPIO numbers here, unlike the NodeMCU's D-pin labels.
Always trust the silkscreen
Pin order varies slightly between makers and revisions. The printing on your board is the truth — don't rely on a picture of a different board.
USB Chips: CP2102 vs CH340 vs Native
The small chip near the USB port turns USB into serial so you can upload code. Which one you have decides which driver to install.
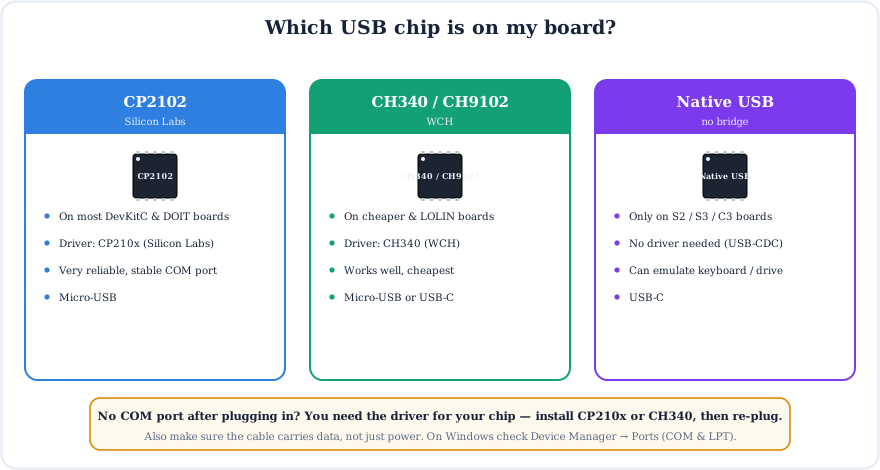
They behave the same once the driver is installed. If you can't see a COM port, it's nearly always the driver or a charge-only cable — not a dead board.
Powering an ESP32 DevKit
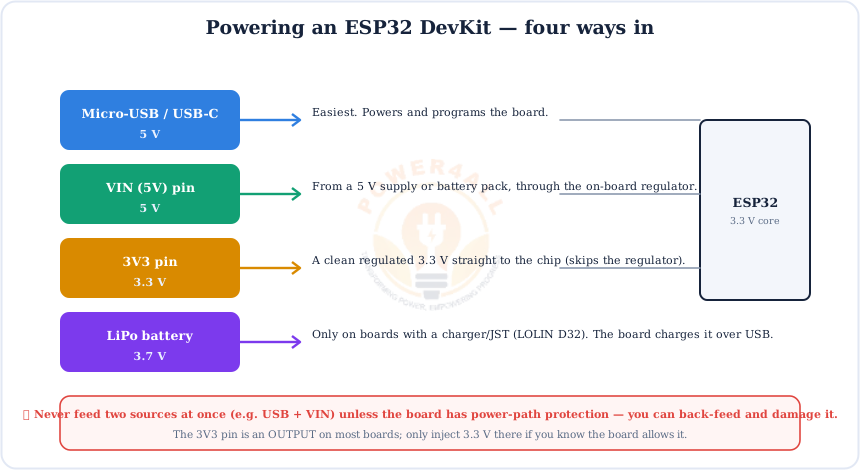
Four ways to get power in. USB is easiest; the others matter once your project leaves the desk.
One source at a time
Don't power from USB and VIN together unless the board has power-path protection — you can back-feed one supply into the other. And treat the ESP32's pins as 3.3 V, not 5 V tolerant (see the chip power section).
Will It Fit My Breadboard?
The single most annoying surprise for beginners: most ESP32 DevKit boards are too wide for one breadboard.
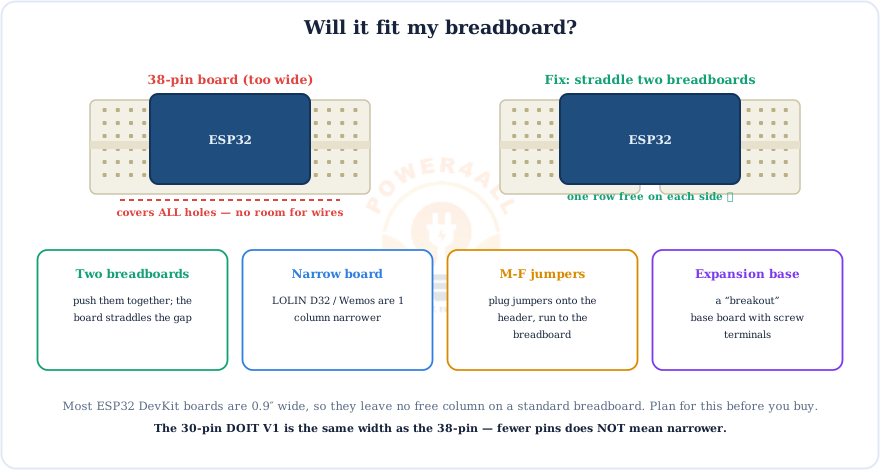
The 30-pin board is the same width as the 38-pin one, so fewer pins does not help here. If breadboarding matters to you, a narrower board like the LOLIN D32 or a Wemos-style board is worth it.
ESP32 DevKit Boards Compared
The popular boards at a glance.
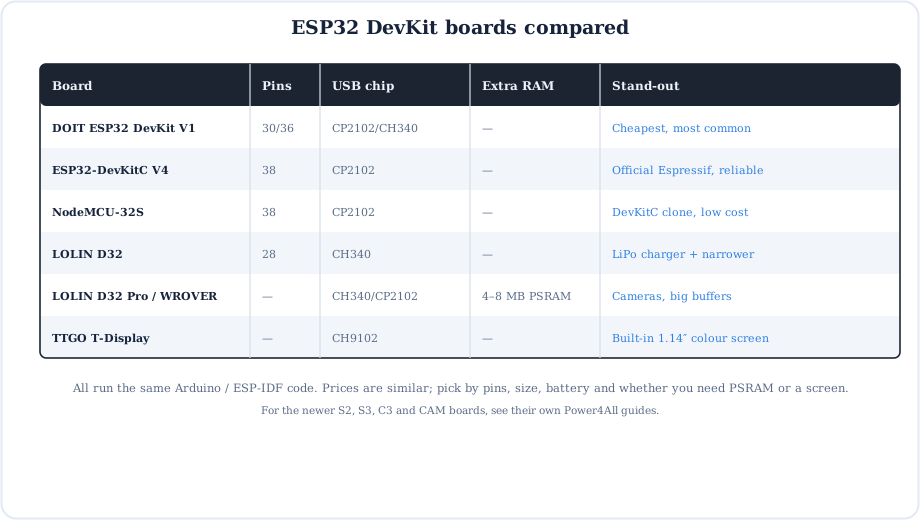
For the newer chip families — the single-core S2, the AI-capable S3, the RISC-V C3 and the camera ESP32-CAM — see their own guides once they're published.
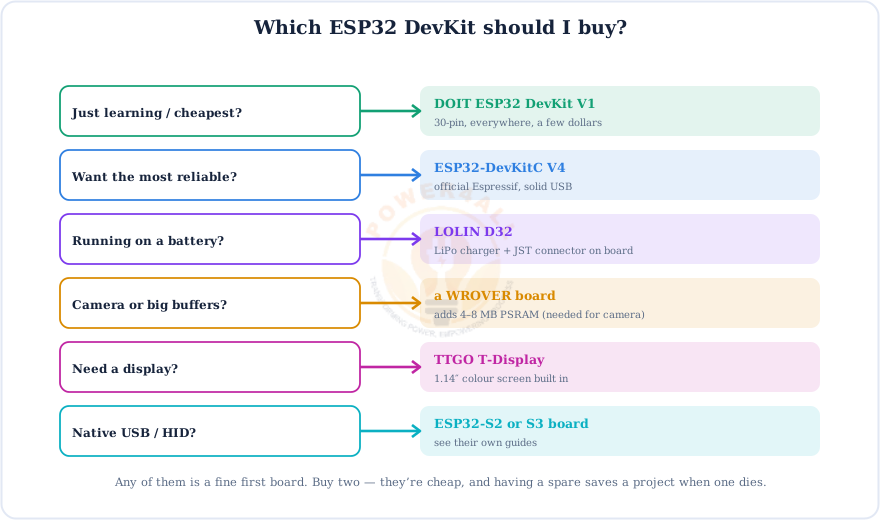
Which ESP32 DevKit Should I Buy?
Match the board to what your project actually needs.
Buy two
ESP32 boards are cheap. Buy a spare — a dead board (usually a power or USB issue, not the chip) shouldn't stop a project, and a second board makes ESP-NOW and Wi-Fi testing far easier.
First Steps With a New Board
Five steps from "just arrived" to "LED blinking".
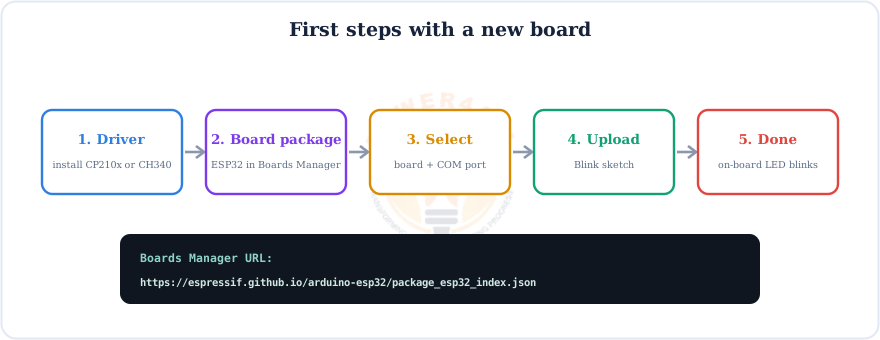
- Install the USB driver for your chip (CP210x or CH340) and plug in with a data cable.
- In the Arduino IDE, add the board URL under File → Preferences:
https://espressif.github.io/arduino-esp32/package_esp32_index.json
then install esp32 by Espressif Systems in Boards Manager. - Choose Tools → Board → ESP32 Dev Module and pick your Port.
- Open File → Examples → 01.Basics → Blink and click Upload. Stuck on Connecting…? Hold BOOT until writing starts.
- The on-board LED blinks — you're ready. Next, learn the pins in the ESP32 guide.
Troubleshooting Common Board Problems
Most "my ESP32 is broken" reports are one of these six, and none of them is a dead chip.
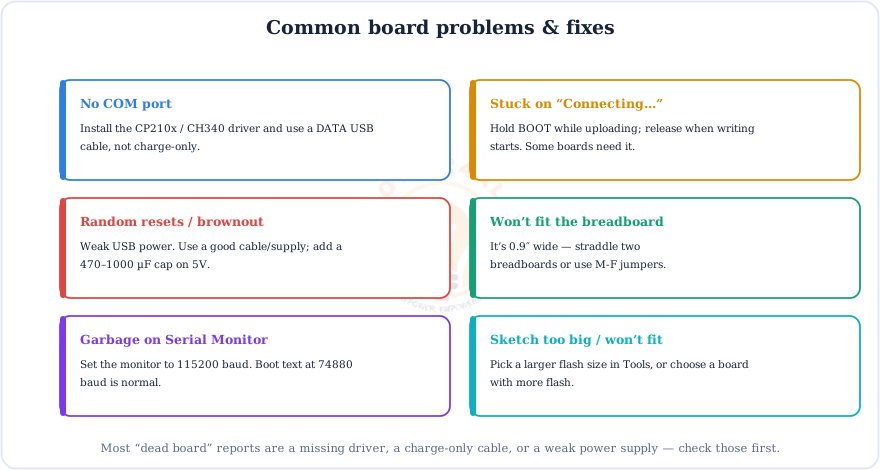
Two quick habits prevent most of these: use a known-good data USB cable, and set the Serial Monitor to 115200 baud. If uploads always need the BOOT button, that's normal for some clone boards.
Frequently Asked Questions
Quick answers to the questions people ask most about ESP32 DevKit boards.
What is an ESP32 DevKit board?
A development board that carries an ESP32-WROOM-32 module plus a USB-to-UART chip, a 3.3 V regulator, EN and BOOT buttons and header pins, so you can power and program the ESP32 over one USB cable. Common versions are the 30-pin DOIT DevKit V1 and the 38-pin ESP32-DevKitC.
What is the difference between the 30-pin and 38-pin ESP32 DevKit?
Both use the same ESP32 and the same GPIO numbers. The 38-pin board just brings out eight more pins: the six SPI-flash pins (GPIO6–11, which you must not use), GPIO0, and extra 3V3/5V/GND. For everyday projects the usable pins are the same.
Which ESP32 DevKit board should I buy?
For learning or lowest cost, the 30-pin DOIT ESP32 DevKit V1. For the most reliable board, the official ESP32-DevKitC. For battery projects, a LOLIN D32 (it has a LiPo charger). For a camera or big buffers, a WROVER board with PSRAM.
Why won't my ESP32 DevKit fit on a breadboard?
Most boards are about 0.9″ wide, so they cover every hole and leave no free column for wires. Straddle two breadboards pushed together, use a narrower board like the LOLIN D32, or use male-to-female jumpers. The 30-pin board is the same width as the 38-pin one.
What is the difference between CP2102 and CH340?
Both are USB-to-UART bridge chips that let the board talk to your PC. They work the same but need different drivers: CP210x for CP2102, and the CH340 driver for CH340 boards. Newer ESP32-S2, S3 and C3 boards have native USB and need no bridge.
How do I power an ESP32 DevKit?
Easiest is the USB port. You can also feed 5 V into VIN, a regulated 3.3 V into 3V3, or a LiPo battery on boards with a charger such as the LOLIN D32. Never feed two sources at once unless the board has power-path protection.
Why is there no COM port when I plug in my ESP32?
Almost always a missing driver or a charge-only cable. Install the CP210x or CH340 driver for your board's USB chip, use a data cable, and check Device Manager under Ports (COM & LPT) on Windows, then re-plug.
Is the DOIT DevKit V1 the same as the ESP32-DevKitC?
Very similar: both carry the WROOM-32 module and run the same code. The DOIT DevKit V1 is a popular third-party board, usually 30 pins and the cheapest. The ESP32-DevKitC is Espressif's official 38-pin board with the flash pins broken out. Either is a good choice.
Conclusion & Key Takeaways
"ESP32 DevKit" is a family, not a single board — but they're more alike than different. Pick by pins, size, power and USB chip, and you can't go far wrong.
Same module
All use WROOM-32.
30 vs 38
Same usable GPIOs.
USB chip
CP2102 or CH340 driver.
0.9″ wide
Plan for the breadboard.
Power
USB, VIN, 3V3 or LiPo.
Start simple
DOIT V1 or DevKitC.